Introduction
You can use Photoshop for almost any kind of image editing, such as touching up photos, creating high-quality graphics, and much, much more. In this lesson, we'll introduce you to the Photoshop interface, including how to open files, work with panels, customize the workspace, and change the display size.
Photoshop is a complex application, and it can feel a bit intimidating to use at first.
About this tutorial
We'll be using Photoshop CC throughout this tutorial to show you Photoshop's features. If you're using an older version of Photoshop—like Photoshop CS5 or earlier—some features may work a bit differently, but you should still be able to follow along. However, if you're using Photoshop Elements, it's important to note that some of the features we'll discuss may be missing or work in a different way.
We'll be using Photoshop CC throughout this tutorial to show you Photoshop's features. If you're using an older version of Photoshop—like Photoshop CS5 or earlier—some features may work a bit differently, but you should still be able to follow along. However, if you're using Photoshop Elements, it's important to note that some of the features we'll discuss may be missing or work in a different way.
Opening files
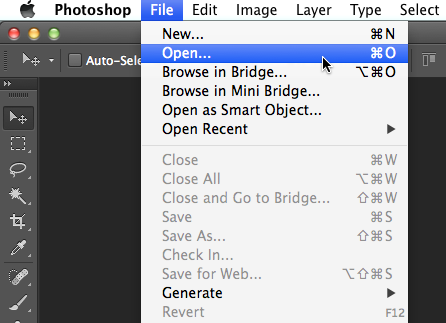
Most of the time, you'll want to start by opening an existing photo rather than creating a new blank image. Photoshop allows you to open and edit existing image files, such as .jpg or .png files, as well as .psd (Photoshop document) files.
Most of the time, you'll want to start by opening an existing photo rather than creating a new blank image. Photoshop allows you to open and edit existing image files, such as .jpg or .png files, as well as .psd (Photoshop document) files.
To open a file:
-
Select File
 Open.
Open.
-
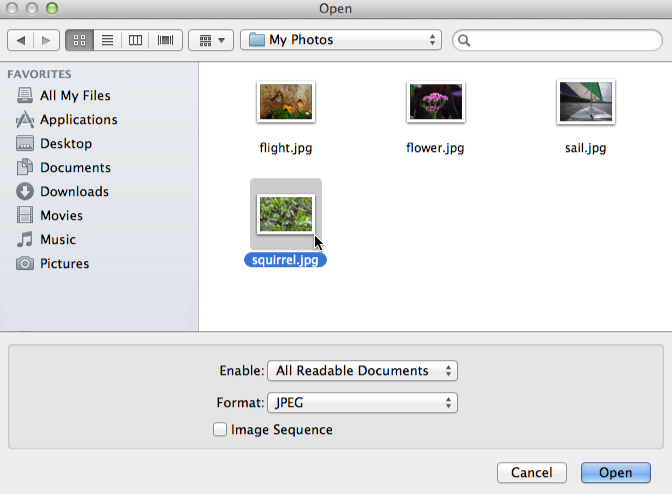
A dialog box will appear. Locate and select the file on your computer, then click Open.
- The file will appear in Photoshop.
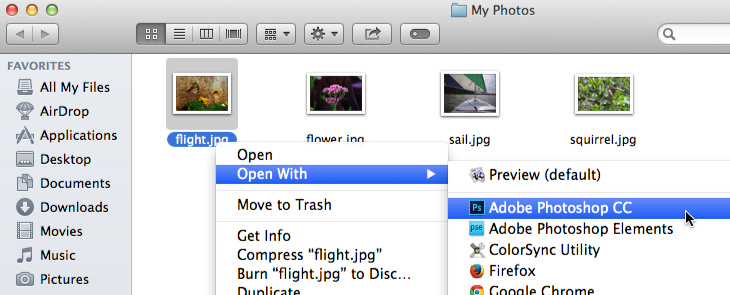
- If you don't currently have Photoshop open, you can locate and right-click the file on your computer and then choose Open With
Adobe Photoshop to open the file.
Select File
Open.
A dialog box will appear. Locate and select the file on your computer, then click Open.
Adobe Photoshop to open the file.
Overview of the Photoshop interface
Because Photoshop is designed primarily for professional use, the interface may feel a bit complex and intimidating for new users. Even if you have some experience with other image editing software, it's a good idea to become familiar with the different parts of the Photoshop interface.
Because Photoshop is designed primarily for professional use, the interface may feel a bit complex and intimidating for new users. Even if you have some experience with other image editing software, it's a good idea to become familiar with the different parts of the Photoshop interface.
Working with Tools and other panels
The Tools panel
The Tools panel is one of the most important features in Photoshop—it's where you'll select different tools for editing images. Once you've chosen a tool, you'll be able to use it with the current document. Your cursor will change to reflect the currently selected tool.
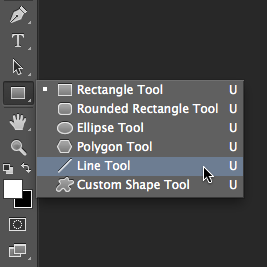
 You can also click and hold to select a different tool. For example, you can click and hold the Rectangle tool to select different Shape tools, such as the Ellipse, Line, or Custom shape tools.
The Tools panel is one of the most important features in Photoshop—it's where you'll select different tools for editing images. Once you've chosen a tool, you'll be able to use it with the current document. Your cursor will change to reflect the currently selected tool.
You can also click and hold to select a different tool. For example, you can click and hold the Rectangle tool to select different Shape tools, such as the Ellipse, Line, or Custom shape tools.
Showing and hiding panels
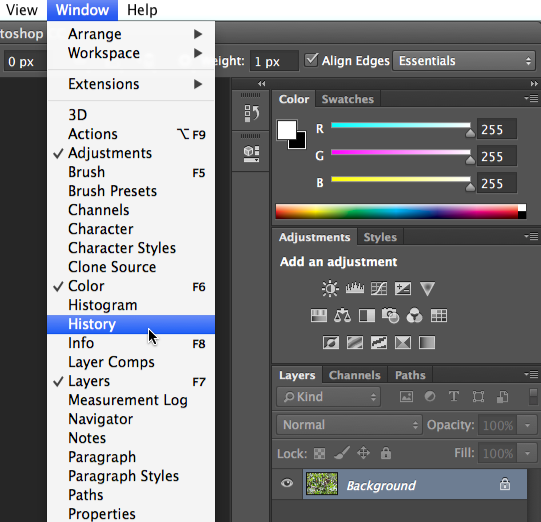
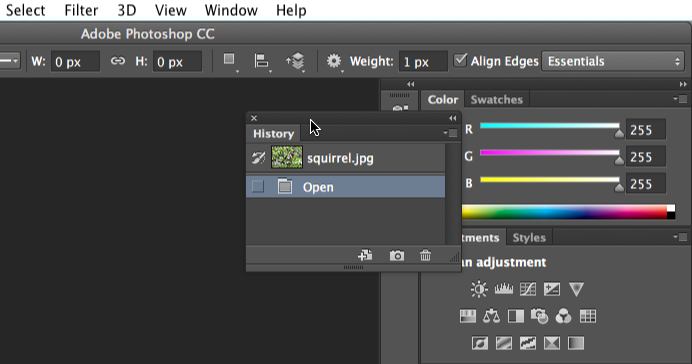
You'll also be able to view and modify a lot of information about the current document through the other panels in the workspace For example, you can view the document's layers in the Layers panel. To show or hide any panel, click the Window menu, then select the desired panel—currently visible panels are indicated by a check mark. In the image below, we're using the Window menu to turn on the History panel:
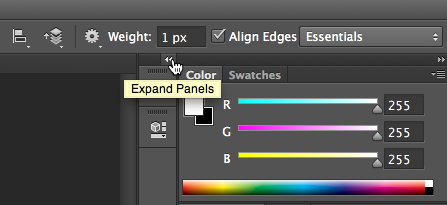
 You can use the double-arrows to expand or collapse panels. This can be helpful if you want to temporarily hide a panel without removing it from the workspace.
You can also press the Tab key on your keyboard to show or hide all active panels.
You'll also be able to view and modify a lot of information about the current document through the other panels in the workspace For example, you can view the document's layers in the Layers panel. To show or hide any panel, click the Window menu, then select the desired panel—currently visible panels are indicated by a check mark. In the image below, we're using the Window menu to turn on the History panel:
You can use the double-arrows to expand or collapse panels. This can be helpful if you want to temporarily hide a panel without removing it from the workspace.
You can also press the Tab key on your keyboard to show or hide all active panels.
Moving panels
If you want to change a panel's location, you can move it by clicking and dragging the panel to a new part of the workspace.
However, if you're planning to follow along with our tutorial, we recommend keeping most panels in the default location for now. To reset the panels to their default positions, select Window
Workspace
Reset Essentials. Note that this process may vary depending on which version of Photoshop you're using. For example, in Photoshop Elements, you'll go to Window
Reset Panels.
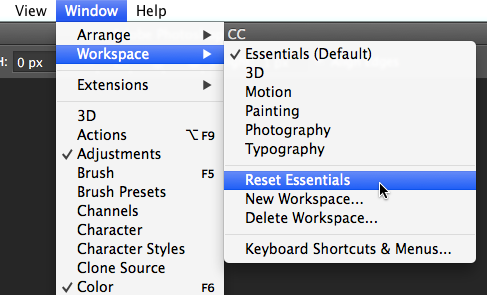
Customizing the Photoshop environment
If you want to customize Photoshop, you can adjust the default application settings. Most of these options are pretty technical, but we'd like to show you two basic adjustments you may find helpful.
If you want to customize Photoshop, you can adjust the default application settings. Most of these options are pretty technical, but we'd like to show you two basic adjustments you may find helpful.
To adjust the default unit:
By default, a document's dimensions are measured in inches. If you're not primarily editing images for prints, we recommend changing this setting to pixels.
-
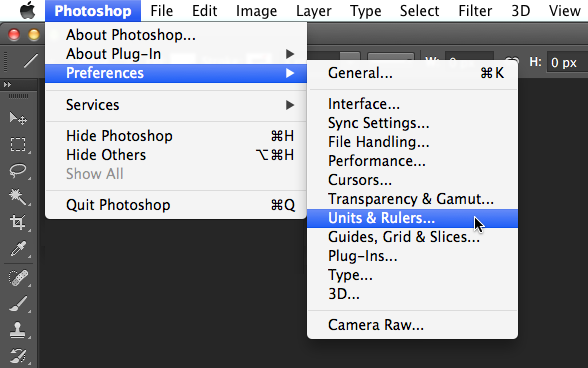
Select Edit
Preferences
Units & Rulers. If you're using a Mac, select Photoshop
Preferences
Units & Rulers.
-
A dialog box will appear. Under Units, click the menu next to Rulers, select Pixels, and click OK. You may need to quit and restart Photoshop for the changes to take effect.
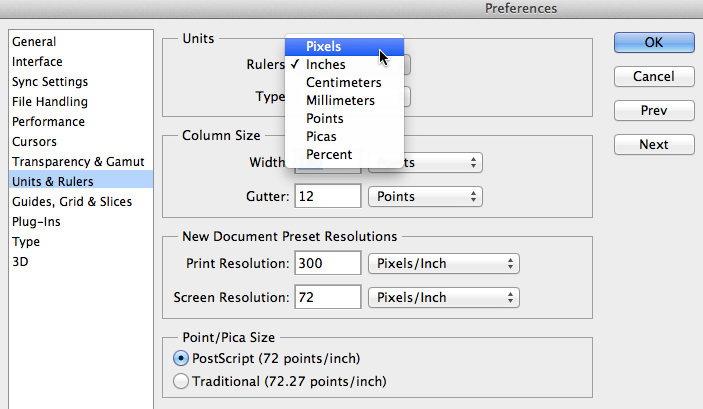
By default, a document's dimensions are measured in inches. If you're not primarily editing images for prints, we recommend changing this setting to pixels.
Select Edit
Preferences
Units & Rulers. If you're using a Mac, select Photoshop
Preferences
Units & Rulers.
A dialog box will appear. Under Units, click the menu next to Rulers, select Pixels, and click OK. You may need to quit and restart Photoshop for the changes to take effect.
To adjust the text size:
If you'd like the text of the Photoshop interface to be larger or smaller, you can adjust the application's text size.
-
Select Edit
Preferences
Interface (or Photoshop
Preferences
Interface on a Mac).
- Under Text, click the menu next to UI Font Size, then select the desired size. You may need to quit and restart Photoshop for the changes to take effect.
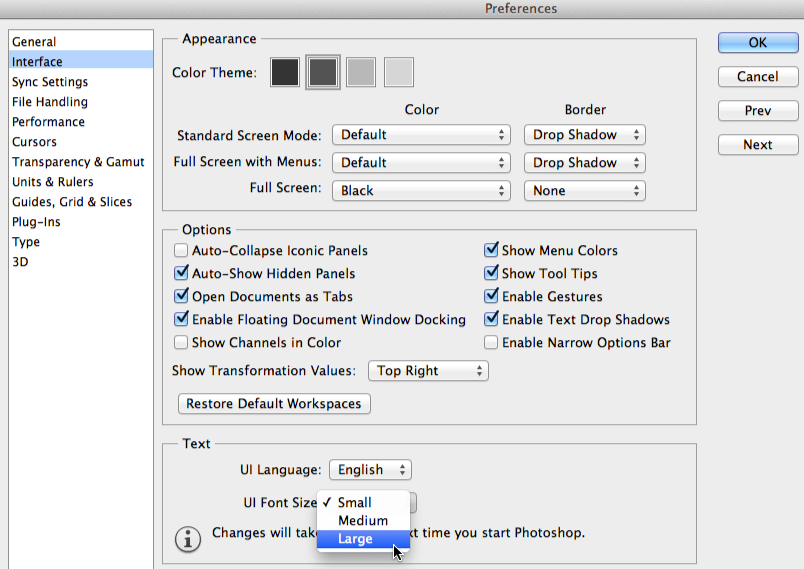
If you'd like the text of the Photoshop interface to be larger or smaller, you can adjust the application's text size.
Select Edit
Preferences
Interface (or Photoshop
Preferences
Interface on a Mac).
Changing the zoom level
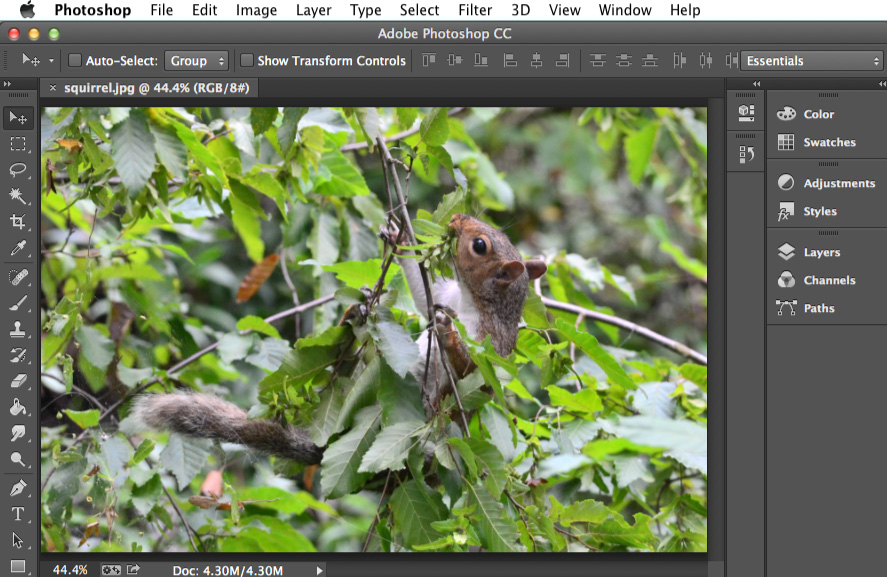
When you're editing an image in Photoshop, you'll often be viewing it at less than 100% of its full size. That's because most modern digital cameras take large, high-resolution photos. These images are so large, in fact, that most computer screens can't display all of the pixels in the image at once. This is actually a good thing, because it means you'll have extra detail to work with as you edit the image.
If you want to zoom in or out, simply press Ctrl+ or Ctrl- (hold the Ctrl key and then press the + or - key). If you're using a Mac, you'll press Command+ or Command-.
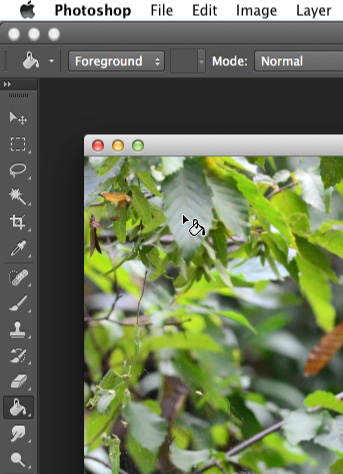
In the example below, you can see a document at 44.4% of its full size. Notice that you can see the current zoom level at the top of the document window, as well as in the bottom-left corner of the screen.
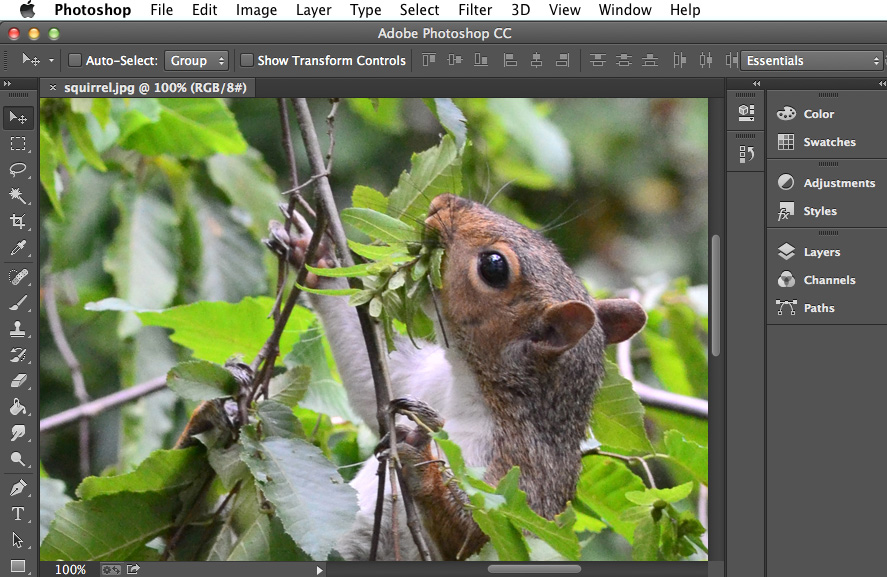
 By contrast, the example below shows the same image at 100% (full size). Notice that only part of the image is visible at this zoom level. If desired, you can use the horizontal and vertical scroll bars to view other parts of the image.
 To zoom the image to fit the document window, press Ctrl+0 (hold the Ctrl key and then press the zero key). If you're using a Mac, you'll press Command+0.
Depending on your computer's graphics card, some zoom levels (such 33.33% and 66.67%) can cause the image to appear pixelated. If this happens, you may want to zoom to 25% or 50% instead.
To zoom the image to fit the document window, press Ctrl+0 (hold the Ctrl key and then press the zero key). If you're using a Mac, you'll press Command+0.
Depending on your computer's graphics card, some zoom levels (such 33.33% and 66.67%) can cause the image to appear pixelated. If this happens, you may want to zoom to 25% or 50% instead.
Hope you enjoyed this lesson.
When you're editing an image in Photoshop, you'll often be viewing it at less than 100% of its full size. That's because most modern digital cameras take large, high-resolution photos. These images are so large, in fact, that most computer screens can't display all of the pixels in the image at once. This is actually a good thing, because it means you'll have extra detail to work with as you edit the image.
If you want to zoom in or out, simply press Ctrl+ or Ctrl- (hold the Ctrl key and then press the + or - key). If you're using a Mac, you'll press Command+ or Command-.
In the example below, you can see a document at 44.4% of its full size. Notice that you can see the current zoom level at the top of the document window, as well as in the bottom-left corner of the screen.
By contrast, the example below shows the same image at 100% (full size). Notice that only part of the image is visible at this zoom level. If desired, you can use the horizontal and vertical scroll bars to view other parts of the image.
To zoom the image to fit the document window, press Ctrl+0 (hold the Ctrl key and then press the zero key). If you're using a Mac, you'll press Command+0.
Depending on your computer's graphics card, some zoom levels (such 33.33% and 66.67%) can cause the image to appear pixelated. If this happens, you may want to zoom to 25% or 50% instead.
Hope you enjoyed this lesson.
Comments
Post a Comment