Introduction
Microsoft Excel 2000 is a spreadsheet application in the Microsoft Office suite. A spreadsheet is an accounting program for the computer. Spreadsheets are primarily used to work with numbers, much like Microsoft Word is used to work with text. Spreadsheets calculate and analyze information by using mathematical formulas.
The Excel window
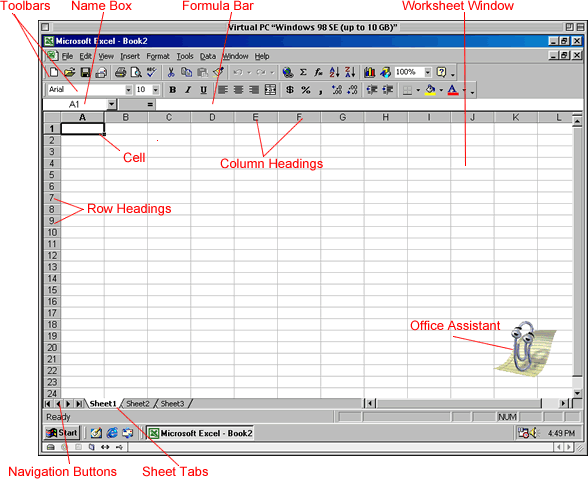
When you open Excel, many items you see are standard in most Windows 95 or 98 programs. A few things are specific to Excel 2000.

Toolbars
Toolbars can be customized and offer a series of commonly used Excel features.
Column headings
Each Excel spreadsheet has 256 columns.
Row headings
Each spreadsheet has 65,536 rows.
Name box
This shows the address and name of the current selection.
Formula bar
This displays the current entry (as you are typing or editing) or the contents of the current cell.
Cell
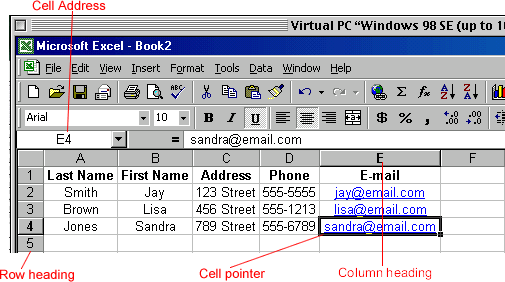
A cell is the intersection of a column and row. Each cell has a cell address. In the image above, the cell address of the selected cell is A1. The heavy border around the selected cell is called the cell pointer.
Navigation buttons
These allow you to easily move to another worksheet in an Excel workbook.
Sheet tabs
These allow you to move around a workbook easily.
The Excel workbook
When you open Microsoft Excel, a workbook automatically shows in the workspace.
Important terms:
- A workbook is made up of three worksheets.
- The worksheets are labeled Sheet1, Sheet2, and Sheet3.
- Each Excel worksheet is made up of columns and rows.
- In order to access a worksheet, click on the tab that says Sheet#.
To change the number of worksheets:
- Choose Tools
 Options.
 - In the Options dialog box, click the General tab.
- Click the spin box controls (up and down arrows) to change the number of worksheets in a new workbook.

The cell
The Excel worksheet is made up of columns and rows. When these columns and rows intersect, they form little boxes called cells.
Important terms:
- Each cell has a unique cell addresscomposed of a cell's column and row.
- The active cell is the cell that receives the data or command you give it.
- A darkened border, called the cell pointer, identifies it.

Moving the cell pointer
- To activate any cell, click the cell.
- To move the pointer one cell to the left, right, up, or down, use the keyboard arrow keys.
- To see other areas of the worksheet, use the scroll bars. To scroll large distances, hold the Shift key while dragging the scroll bar.
Some frequently used keyboard commands:
Page Down: Moves down one screen
Page Up: Moves up one screen
Home: Moves to column A in the current row
Ctrl+Home: Moves to cell A1
Page Up: Moves up one screen
Home: Moves to column A in the current row
Ctrl+Home: Moves to cell A1
Challenge!
- Use the horizontal and vertical scroll bars to explore the Excel worksheet.
- Explore using Page Up, Page Down, Home, and Ctrl+Home.
- To see other areas of the worksheet, use the scroll bars. To scroll large distances, hold the Shift key while dragging the scroll bar.
Comments
Post a Comment